I’m having trouble figuring out how to move videos from my GoPro to my Mac. I tried connecting the camera to my computer, but the files aren’t showing up like I expected. I really need to edit these clips soon and could use some advice on the best method to do this. Any tips or step-by-step guides would really help me out.
So You Wanna Get Those GoPro Clips to Your Mac? Here’s How
Alright everyone, this post is for all the folks who’ve survived adrenaline-packed weekends only to end up stuck staring at your GoPro, wondering: How do I get these epic fails and accidental thumb-cam moments onto my Mac? Been there—so let’s get your footage out of the camera graveyard. I’ll hit you up with two different methods, both tried-and-true: good ol’ SD card hustle, and the MacDroid app magic.
Classic Move: Pulling Videos Off Your SD Card
Imagine your GoPro is an old-school disposable camera and your SD card is the film. No Wi-Fi, no fuss—just direct and effective. Here’s my personal routine, perfected after too many sandy rides:
-
Pop Open the GoPro
Pull out the SD card. (Pro-tip: power off the camera first unless you want to corrupt your data. I learned this the hard way.) -
Plug the Card Into Your Mac
Most Macs need a USB SD card reader; some have a slot, but don’t count on it unless you’re using an older MacBook Pro. Slot the card in and wait for “NO NAME” or “Untitled” to pop on your desktop. -
Find Your Videos
Open Finder, locate the card, then dig through the DCIM folder. You’ll see cryptic filenames like “GOPR1234.MP4.” Those are your golden moments—or disasters you want to upload to your group chat. -
Drag and Drop
Move your files onto your desktop or a special folder called “My GoPro Chaos.” Depending on file size, this could take seconds or a solid cup of coffee. -
Eject the Card Properly
Drag the SD card icon to the trash or hit that tiny eject button in Finder. Just ripping it out turns your SD card’s future into a scary lottery.
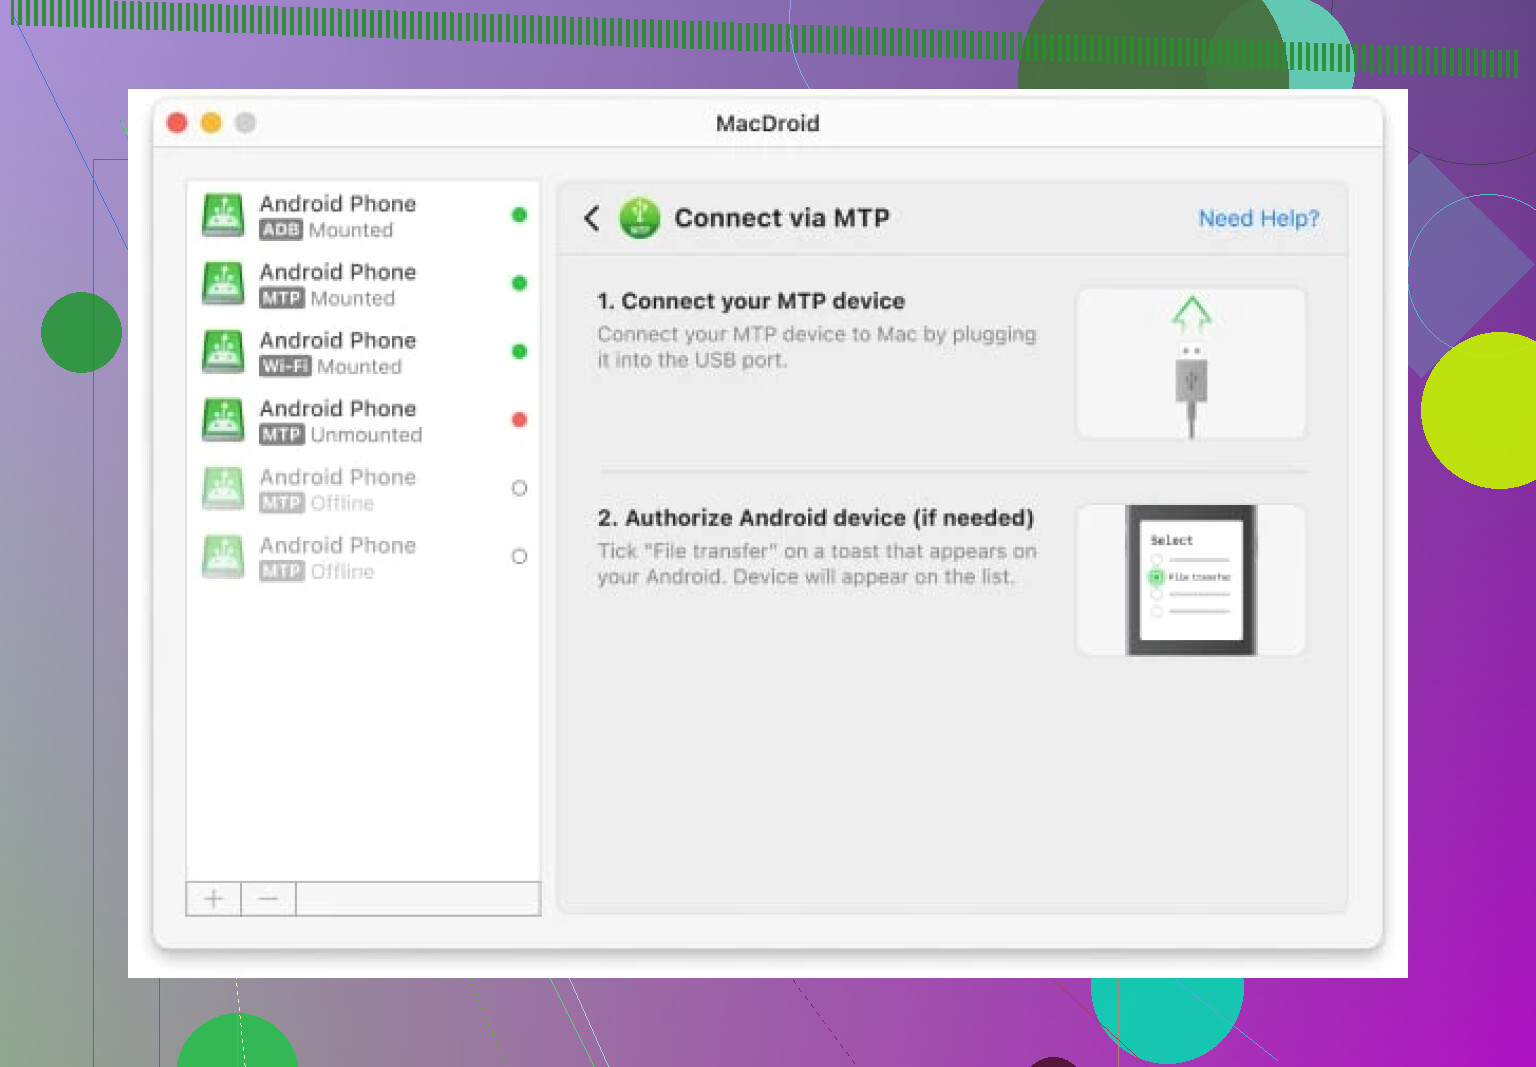
MacDroid App: The Sidekick for Your GoPro Transfers
Okay, so maybe you don’t like fiddling with hardware. Or your SD card slot laughs at you and says, “Not compatible.” Enter: MacDroid. This app is supposed to be for Android devices, but guess what? Plug in your GoPro with a USB cable, and it works for file transfer just as well—no SD card required.
Here’s the breakdown:
-
Step 1: Download & Install
Go snag MacDroid from the App Store. Installation’s typical drag-into-Applications stuff. -
Step 2: Connect Your GoPro to Your Mac
Plug that GoPro in using a USB cable. Yes, it will probably beep and flash. Just let it do its thing. -
Step 3: Fire Up MacDroid
Launch the app. It’ll prompt you to detect your device (the GoPro). Tick whatever access permissions it wants—unless you’re feeling rebellious. -
Step 4: Locate and Transfer Your Footage
Browse your GoPro’s storage as if it were a regular external drive. Find your videos, and copy them over to your Mac with a simple drag and drop. Done.
That’s it. You don’t need to fight with GoPro’s sometimes-clunky native apps, and everything shows up in Finder like a normal USB stick.
TL;DR
TL;DR: If you’re old-school (or your WiFi hates you), yank the SD card and plug it in. If you’d rather avoid the SD fuss, pair your GoPro with your Mac via USB and use MacDroid to move videos with minimal drama.
Let’s be honest, whichever method you pick, at least you’ll finally get to edit that “Epic Tree Fail” highlight reel. Good luck!
14 Likes
Lol, love @mikeappsreviewer’s thoroughness (and yeah, the SD card hustle works if you’ve got a slot handy), but if you’re already at the point where Finder’s giving you nothing when you hook up your GoPro? Welcome to dongle despair. Legit, sometimes the GoPro just doesn’t show up as a drive—USB mode can be temperamental (especially on newer Macs). Here’s a left-field tip I swear by: the GoPro Quik app. Hear me out—yeah, it’s not the slickest, and sometimes it feels like downloading an entire rock concert to play one song, but it does reliably detect most models and will auto-import your vids, even when Finder ghosts you.
Download Quik, open it, plug in your cam, and let it hunt for files. You pick where they go. Best part? It yells at you if something’s wrong, unlike Finder’s silent treatment. Still, for true drag-and-drop freedom, SD card + reader or the MacDroid trick that Mike mentioned are undefeated. AirDrop or uploading to iCloud isn’t worth it unless you love waiting forever (wireless is sloooow unless you’re just moving tiny clips).
Also—don’t sleep on a simple USB-C card reader (they’re like $10 on Amazon, and no app shenanigans). But hey, try Quik if you’re all out of options and your deadlines are looming. Oh, and backup before editing, trust. The GoPro gods are chaotic, and nothing’s safe until it’s copied twice.
If you’re after “easiest,” honestly, straight-up AirDrop from the GoPro app on your phone to your Mac actually works if you’re cool transferring just a few clips (and don’t need raw 4K monsters). It’s not as legendary as @mikeappsreviewer’s SD deep dive or @cazadordeestrellas’s Quik crusade, but sometimes the path of least resistance wins when your camera just won’t play nice with Finder and you don’t want to fiddle with cables, card readers, or extra apps. Here’s the dirty secret: the GoPro app can wireless-transfer to your iPhone, then you AirDrop to Mac. Downside: you lose that original quality, there’s compression, and if you’re hurling an hour of helmet-cam, forget it—it’ll crawl slower than a dial-up modem. Still, for “oh no I need that one sick jump for Instagram right now” emergencies, it’s oddly painless.
Full-res? Reality is you sorta have to get cozy with a hardware dongle or take a shot on MacDroid if Finder’s stonewalling you. But for those quick hits or if you forgot your SD reader at home (because, let’s be honest, who hasn’t?), AirDrop wirelessly via phone is about as “one-tap” as it gets—just don’t blame me for degraded footage. Stay vigilant, backup, and maybe pray to the USB gods for next time.
Let’s call out the honest truth: dragging files out of your GoPro can be a juggling act, and everyone swears by their method. The SD card hustle is classic—super dependable unless you’re stuck with a MacBook Air that laughed off SD slots a decade ago (looking at you, modern Mac users…). The AirDrop shortcut is chill for quick Instagram stories, but c’mon, nobody’s transferring a 10GB 4K file that way unless you enjoy watching progress bars more than actual footage.
Now, about MacDroid. Big pro: it just works, making your GoPro’s storage pop up in Finder like a boring old USB stick. No gunky GoPro portals or new accounts to create, and unlike the GoPro Quik/GoPro Player shuffle some folks push, MacDroid skips the “mystery meat” UI. It does cost a bit if you want full features, and initial permission prompts are a minor speed bump (expect OS nags about privacy, welcome to Macland).
Negatives? Sure—some will never love installing a third-party app, and if your cable’s flaky, MacDroid won’t save you. But compared to fiddling with flaky wireless transfers or wrestling with GoPro’s native apps—which often bug out, as detailed by fellow posters—it’s a smart workaround for stubborn Finder blocks.
TL;DR: MacDroid is a legit bridge if native methods stall. Not as raw-hardware as SD card pulls, nor as “one-and-done” as airdropping single clips, but a nice, sane center lane—especially if you’re tired of chasing dongles or want your files, now. Don’t sleep on disk ejection, though—no app can fix a corrupted SD!