I accidentally deleted a bunch of family photos and need to use data recovery software for the first time. I’ve narrowed it down to Disk Drill and EaseUS, but as a complete beginner I’m worried about picking something too complicated. Which one has the most beginner‑friendly interface, clearer steps, and safer defaults for someone who’s never done data recovery before?
I’m going to rewrite this from my own angle, but the story is the same: what happens when stuff goes sideways and you need your files back, fast.
Okay, here goes.
I didn’t start caring about data recovery tools because of features or specs. I cared the first time I sat there staring at an empty drive, feeling my stomach drop.
External drive. Years of photos. Windows suddenly showing it as RAW. You know that sick feeling where you keep unplugging and replugging the thing like it might magically fix itself? That.
So I did what everyone does. Searched Reddit, grabbed the tool people shout about the loudest, installed it, opened it up.
And instantly hit a wall.
“Select scan type.”
“Select file system.”
“Custom file signatures.”
“Sector size.”
It felt like being dropped into a BIOS menu in another language.
I picked the “default” looking options, started the scan, waited around forty minutes. It eventually spit out a huge flat list of files with weird names, no folders, barely any previews.
Recovered a bunch of stuff anyway. Half the photos had visual glitches. Some videos opened and froze on the first frame. Some crashed VLC. No hints before recovery, no health indicator, nothing.
Time lost, stress higher, files still not safe.
How Disk Drill entered the picture
After that mess I tried Disk Drill. I expected more of the same, to be honest.
What I got was:
- Clean list of drives with size, file system, and status.
- Clicked the problem drive.
- Hit one button.
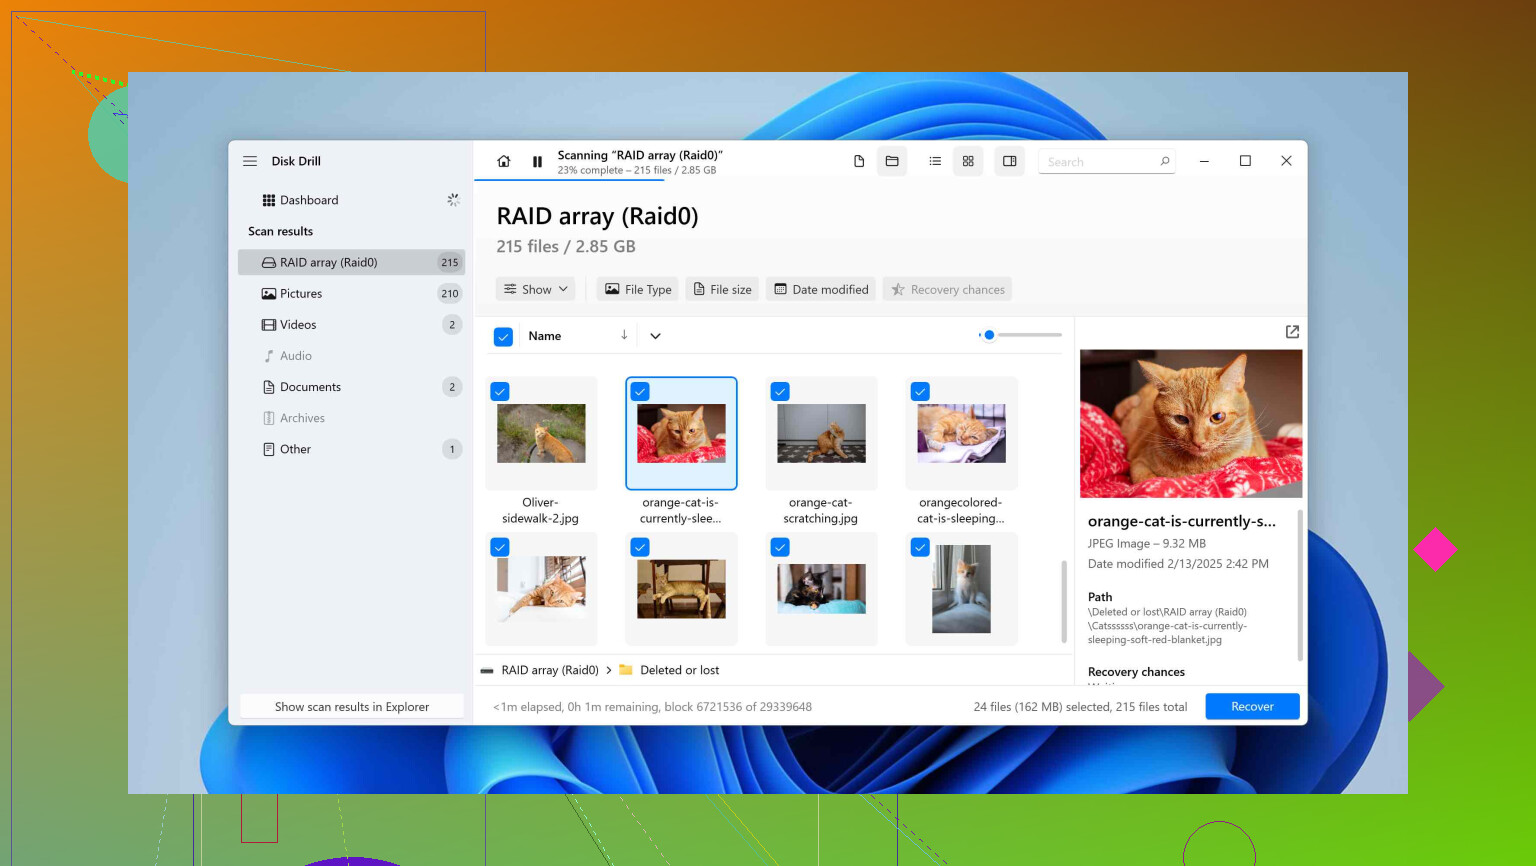
No scan type wizard, no jargon. It started doing its thing, and within maybe half a minute there were folders appearing: Pictures, Video, Audio, Documents, etc.
The key parts for me:
- I could preview photos full size, not random thumbnails.
- I could play video inside the app before recovering.
- Each file had a “chance of recovery” indicator (high / medium / low) that matched reality when I tested.
That same RAW external drive that gave me hot garbage with the free tool got fully recovered in about ten minutes of scanning. I went through previews, picked the important stuff, recovered to a different drive, done. Whole ordeal from panic to files restored was maybe twenty-five minutes.
If you want another angle on it, there is a solid writeup here:
The part everyone skips: the “in between” step
Most recovery tools kind of treat the “results” screen like a dump. Here is 40,000 files, good luck.
Disk Drill feels closer to an actual file manager:
- You get folder structure when it is recoverable.
- You get categories by type when structure is gone.
- You get filters: type, size, date, recovery chances.
- You get a real viewer for images, video, documents.
The recovery chance thing is not hand-wavy. When it says “high,” the file has been intact in my experience. When it says “low,” I learned to ignore it unless I am desperate.
I have run a few hundred files through it over time, and the predictions lined up almost every time. That removes the casino feeling you get with some tools where you recover blindly then see what survived.
Why camera and drone users should pay attention
This is the part I never saw mentioned enough, and it is what made me stick with Disk Drill.
If you record video on:
- GoPro
- DJI drones
- Canon / Sony / Nikon cameras
- Action cams in general
the SD card does not hold data like your PC drive. Those devices write video in fragments scattered across the card. The camera’s file system keeps track, and as long as that index stays healthy, your clips play fine.
Once the card gets formatted, corrupted, or the file system breaks, that index is gone. Now you have one big mess of video fragments mixed together.
Most tools deal with this by doing signature-based recovery. They look for the header of a video file, start reading data, then stop when they hit another file signature. Sounds logical. In practice it produces Franken-video:
- A few seconds of your clip
- Then static
- Then a frame from some other moment
- Then total crash
I have seen countless posts where someone says “I recovered my videos but they are all broken.” That is almost always this fragmentation problem.
Disk Drill has a mode called Advanced Camera Recovery. I do not know the exact math behind it, but the behavior is different.
From what I have seen:
- It understands how specific brands write data.
- It identifies video fragments.
- It pieces them back together in the correct sequence.
I wiped a DJI SD card by accident once. Four long clips, all fragmented all over the card. Advanced Camera Recovery reconstructed all four as clean, playable files. No glitching, no weird frames from other clips, no random freezes.
To make sure I was not fooling myself, I pointed two other well known recovery tools at that same card image:
- Tool 1 gave me four MP4 files that were unplayable.
- Tool 2 gave me about a dozen tiny video fragments, each a few seconds long, mostly broken.
Same card, same dataset, wildly different outcomes.
If you shoot weddings, client work, travel videos, or family footage on SD cards, this matters. Losing a single clip from somebody’s wedding or a once-in-a-lifetime trip is brutal. I have not seen another consumer tool handle fragmented camera footage as well.
The “your drive is dying” scenario
This is the other big thing where I stopped treating Disk Drill as “just another utility” and started respecting the design.
Most people, when a drive starts:
- Making clicking or buzzing sounds
- Mounting very slowly
- Throwing I/O errors
will instinctively fire up a recovery tool and scan it directly. That is what I used to do too.
The problem is, a full scan means reading every sector. On a failing drive, hammering it with thousands of reads is sometimes the last straw.
The professional advice I hear from lab folks is:
- Get a sector-by-sector copy first.
- Work on the copy.
- Avoid stressing the original more than needed.
Disk Drill has a “byte-to-byte backup” feature built in and it behaves like the tools pros talk about, but with a simple UI.
What made it useful for me:
- First pass moves through the drive quickly and skips painful sectors.
- Later passes retry the problematic zones with smaller chunk sizes.
- You see a visual map of sectors:
- Green for copied successfully
- Gray for pending
- Red for unrecoverable
- You can pause and resume, which matters if the drive gets hot or your system is under heavy load.
I used it on a USB drive that started making faint ticking noises and sometimes vanished from Explorer. I imaged the whole thing, unplugged it, then did all recovery work on the image file.
About a week and a half later that USB drive stopped mounting completely. If I had tried to deep-scan it first, there is a decent chance it would have died mid-scan.
This approach alone probably saved that data.
Drive health monitoring that saved me twice
Disk Drill pulls S.M.A.R.T. data from drives and shows it in a way normal people can read.
Quick rundown if you have never touched S.M.A.R.T.:
- It is built into HDDs and SSDs.
- Tracks stuff like temperature, reallocated sectors, error counts, total power-on hours.
Most people ignore it. I did too.
Disk Drill shows a simplified status. Green, warning, bad. Plus some readable explanation instead of raw hex numbers.
I had two drives show warnings over the last few years:
- Both had rising reallocated sector counts.
- Temperatures looked fine.
- Performance was “okay but slightly off.”
If I was not looking at S.M.A.R.T., I would have shrugged at the slight slowness. Instead, I cloned both, swapped them out, and both drives got worse within months.
That is the sort of thing you forget about until it saves you once.
The feature I thought was useless until it helped: Recovery Vault
When I first saw Recovery Vault, I thought “this looks like something I will ignore.” Turned out it is one of the few “safety net” features I leave enabled on purpose.
What it does:
- You pick folders that matter, like Documents or project directories.
- Disk Drill quietly tracks metadata for deleted files from those places.
- It does not keep full copies of files, it tracks names, locations, and structure.
That means:
- When you delete a file from a watched folder, recovery is much cleaner.
- You get the original path and name back.
- Recovery is faster and more precise.
Resource usage on my system is tiny. I pointed it at:
- My Documents folder
- Work project folder
- Desktop
Forgot it existed for months.
Then I nuked a file from the wrong folder. Went into Disk Drill, and it took about three seconds to bring it back with the correct name and original location.
Without Recovery Vault, that same file would have come back as something generic in a big “found files” pile. It sounds like a small quality of life thing, but once you start restoring dozens of files, human readable names matter a lot.
Cross-platform stuff that turned out handy
One detail that did not look important at first but helped later: one license covers Windows and macOS.
I have a desktop on Windows and a MacBook I carry around. Using the same interface on both was already nice, but the part that surprised me:
You can:
- Start a scan on one machine.
- Save the session.
- Move it to the other OS.
- Open it and continue there.
Example where this helped me:
- I had a failing external drive plugged into my desktop.
- Started an image and scan in Disk Drill on Windows.
- Needed to head out but wanted to review and filter results on my MacBook later.
- Saved the session, moved it, continued working there, recovered to a large external disk attached to the MacBook.
It is not a headlining feature, but these are the kinds of details that tell me someone sat down and watched how people actually use the thing.
Things it does not solve
I do not treat Disk Drill as magic. There are clear limits.
You will be disappointed if you expect:
- Full-blown RAID forensic reconstruction with manual parameter tuning.
- Native Linux version for raw recovery directly inside Linux.
If you are running a professional lab, you probably already own specialist tools anyway. Different toolbox.
How I would approach a real data loss event now
If you are reading this during an active “oh no I deleted everything” situation, here is what I would personally do, step by step. This is the practical part I wish someone had posted the first time I ran into trouble.
-
Stop writing to the affected drive
- Do not copy files onto it.
- Do not install software onto it.
- Do not format it “to see if it helps.”
-
If the drive is making odd sounds or throwing errors
- Plug it in once.
- Open Disk Drill.
- Use byte-to-byte backup to make an image to a healthy drive with more free space than the failing one.
- Unplug the failing drive once imaging is done.
- Work only on the image file.
-
If it is an SD card from a camera or drone
- Do not shoot new footage on it.
- Mount it read-only if you know how, or at least avoid writing anything new.
- In Disk Drill, use Advanced Camera Recovery on the card or its image.
-
During scanning
- Let Disk Drill run its full scan on the target.
- Do not interrupt unless the drive is overheating or making scary noises.
- Once results show up, start with the “Existing” and “Reconstructed” folders, then file type categories.
-
Before recovering
- Use preview heavily. Check that photos open, videos play, documents look intact.
- Sort or filter by “recovery chances” and grab the “high” ones first.
- Recover to a different physical drive, not the same one.
-
After recovering
- Spot test your most important files thoroughly. Watch whole videos, not 5 seconds.
- If everything critical checks out, then decide if you want to try to salvage low-chance items for curiosity.
Why I keep Disk Drill installed
At this point I see it like a fire extinguisher on my system. I hope I do not need it often, but I am glad it is there.
The parts that matter to me personally:
- One-click main scan workflow.
- Strong previews that match what you get after recovery.
- Advanced Camera Recovery that handles fragmented footage correctly.
- Byte-to-byte backup that respects failing drives instead of pulverizing them.
- S.M.A.R.T. monitoring that quietly warned me about upcoming failure.
- Recovery Vault as a low-impact safety net on folders I care about.
- Cross-platform sessions that follow me between Windows and macOS.
If you are trying to decide between recovery tools, spec sheets will not tell you how it feels when something important goes missing at midnight and you are tired and stressed.
My honest suggestion is simple:
Install Disk Drill’s free version, point it at your real problem drive, let it scan, and see what it finds and how it presents it. Do the same with any other tool you are considering. Compare not only what they find, but how obvious the “safe path” feels while you are using them.
That real-world test told me a lot more than any feature checklist.
20 Likes
Short answer for a total beginner: Disk Drill is simpler than EaseUS for photo recovery.
EaseUS is fine, but its UI feels more “utility” and less “guides you by the hand”. You get more technical prompts, more scan types, more places to click wrong. For someone stressed about family photos, that adds pressure.
Disk Drill is closer to what you described you want:
- Install.
- Pick the drive or SD card.
- Hit one big scan button.
- Wait.
- Browse pictures, preview, then recover to a different drive.
You already saw @mikeappsreviewer cover the deep stuff like drive imaging and camera recovery. I agree with most of that, though I think for your case you do not even need to touch those advanced options. For a simple “I deleted files” event, Disk Drill’s default “All recovery methods” scan is enough. No need to think about file systems, scan modes, or sector sizes. EaseUS tends to expose a bit more of that, which is where first timers freeze up.
Where Disk Drill helps beginners:
• The folder tree and file type groups look like a normal file manager. You click Pictures, see JPEG/PNG, hit preview, done.
• The recovery chance labels help you stop wasting time on junk files.
• The preview is honest. If the thumbnail looks broken or the preview fails, you skip that file instead of recovering thousands of useless items.
EaseUS strengths:
• The install flow is fast.
• It has been around a long time and has lots of guides.
• On simple, non fragmented deletions, results are similar.
Where EaseUS feels worse for first timers, in my experience:
• The results view turns into a big flat list fast. You scroll a lot, you guess a lot.
• File names often come back generic, which is painful for photos.
• The interface tries to mix wizard steps with “pro” toggles. That confuses new users.
For your specific case, I would do this:
- Stop using the drive or card with the deleted photos. No copying, no installs to it.
- Install Disk Drill to a different drive.
- Run the main scan on the problem drive.
- Use the Pictures section, turn on preview, and only select the photos that open cleanly.
- Recover to a third device, not back to the original one.
If you want to read a more methodical take, this writeup helped a lot of people compare tools in plain language:
Is Disk Drill the right data recovery tool for you
Between the two, for a stressed first timer with family photos, I would pick Disk Drill every time and leave EaseUS for people who do not mind a bit more technical noise.
Short version: for a first‑timer in full panic over family photos, Disk Drill is the safer, simpler pick vs EaseUS.
Where I slightly disagree with @mikeappsreviewer and @codecrafter is this: EaseUS isn’t that complex on paper, but in practice its “wizard + extra options” layout makes it way too easy to second‑guess yourself when you’re already stressed. The UI looks friendly until it hits you with multiple scan passes, different views, and a giant wall of half‑named files. Beginners get decision fatigue fast.
Disk Drill keeps you in one main path:
- Pick the drive or SD card
- Hit the big “all recovery methods” scan
- Wait
- Browse folders / Pictures category, preview, recover
The important “hand‑holding” parts for a beginner that those two already touched on but I’ll frame a bit differently:
-
Mental load
EaseUS feels like using a system utility. It doesn’t force you to choose scan types, but it constantly hints there’s a “better” or “deeper” option if you fiddle more. If you’re not technical, that just makes you doubt every click. Disk Drill is much more “this is the right button, just press it.” -
Sorting real photos from junk
Both tools will find tons of files. EaseUS tends to drown you in a big, flat mess with a mix of intact stuff, broken fragments, temp files, and random garbage. You can work with it, but it’s tedious.
Disk Drill’s folder tree + file type groups + realistic “recovery chances” label make it way easier to focus on actual photos of your family instead of mystery files. -
Previews you can trust
@mikeappsreviewer already went long on this, so I’ll just add: in EaseUS I’ve had a lot more “it previews fine, but the recovered file is corrupt” moments. Not always, but enough to be annoying. Disk Drill’s preview → final result consistency has been better for me. -
When you absolutely do not want to think about tech
EaseUS is okay once you understand file systems, partitions, etc.
Disk Drill works better when your entire knowledge level is “I had pictures, I clicked something dumb, now they’re gone.”
Given your specific situation, here’s what I’d actually do differently from their longer step‑by‑step lists:
- Don’t overcomplicate this with advanced modes unless the drive is physically acting weird (clicking, disconnecting, super slow).
- Install Disk Drill to a different drive than the one with the deleted photos.
- Select the problem drive or SD card.
- Run the default full scan and just let it finish.
- Go straight to the Pictures section, turn on preview, and only tick photos that:
- open fully
- are not half gray or obviously glitched
- Recover to a separate drive, not back to the same one.
EaseUS can do this too, but it will make you fight the interface more. For a first run, you want something that behaves like a photo browser, not like a system admin toolkit.
If you want a quick background on why any of this works at all and what actually happens when you delete files, this explains it in plain language:
how data loss really works and what you can still recover
Given your “total beginner, family photos, don’t want to screw it up” combo: pick Disk Drill, ignore most of the fancy stuff, run one full scan, live in the preview window, and you’ll be fine.
If your only goal is “get my family photos back without learning file systems,” Disk Drill is the simpler pick over EaseUS, even if I don’t agree with everything @codecrafter, @waldgeist and @mikeappsreviewer said.
They already covered the disaster stories and the detailed workflows, so I’ll zoom in on the beginner angle and where the two tools actually feel different.
Ease of use for a first timer
Disk Drill:
- Very clear first screen: list of drives, size, status, big button to start.
- You are basically encouraged to use one default “all methods” scan.
- Result view behaves a lot like a normal file browser with pictures grouped nicely.
- Recovery chances (high / medium / low) give you a sanity check before you commit.
EaseUS:
- Looks friendly at first, but:
- More views, more tabs, more “do you want to run another scan” moments.
- Results feel more fragmented. You can get the same files shown in different sections.
- It is not impossible to use, just more second guessing when you are already stressed.
Here is where I slightly disagree with the others: EaseUS is not some super complex beast. If you are the kind of person who happily clicks through partition managers, you will be fine. The problem is you said “total beginner,” and in that context “fine after a learning curve” is already too much.
Pros of Disk Drill for your situation
Specific to “I deleted photos and I am new to this”:
-
One main path instead of many knobs
You don’t really have to know what a quick scan or deep scan is. Start one full scan, wait, review. -
Photo‑centric preview that behaves like a gallery
This matters more than people admit. Being able to arrow‑key through photos full size inside the app is a huge time saver. It also helps you catch corrupt images before wasting time recovering them. -
Recovery chance indicator that actually lines up with reality
Combined with preview, it lets you prioritize “High” items that look correct, so you get your best shots out first. -
Nice for camera / SD card use
Others already went into Advanced Camera Recovery in detail. Short version: if those family photos are on an SD card, Disk Drill has a better track record with reassembling fragmented camera files than most generic tools.
Cons of Disk Drill you should know about
It is not magic, so a few caveats:
-
Not the strongest choice for advanced scenarios
Complicated RAID setups, unusual file systems, or very niche forensic work are not its strength. EaseUS is also not a forensic tool, but it does expose more “techy” controls which some advanced users might miss in Disk Drill. -
Windows and macOS only
If you are on Linux natively, you will be imaging the drive and then working from another OS. -
License needed for full recovery
The free version is fine to see what can be recovered, but actually pulling back a large batch of photos requires a paid license. Same story with EaseUS though, so this is not a unique downside. -
Can feel “too guided” if you like tweaking
This is subjective, but if you want to manually select file systems, adjust scan strategies and experiment, Disk Drill intentionally hides most of that. Beginners benefit, tinkerers sometimes feel boxed in.
How this compares to what others said
- @codecrafter leans into the “specs vs real use” idea and I generally agree. On paper the two tools look similar. In a panic at midnight, Disk Drill’s single clear “do this” path helps more than EaseUS’ layered options.
- @waldgeist paid more attention to general recovery behavior and reliability. I’d add that for simple accidental deletion, the subtle UX details (previews, recovery chance labels) matter more than one extra scanning mode.
- @mikeappsreviewer gave a long story about advanced features like byte‑to‑byte backup and S.M.A.R.T. monitoring. Those are great if your drive might be failing physically, but for your current “oops, deleted photos” case, they are nice bonuses, not must‑haves.
Bottom line
For a complete beginner who just wants to get family photos back once, with minimum thinking:
- Disk Drill is more “click, wait, browse your photos”
- EaseUS is more “click, read options, wonder if you chose the right scan, then dig through more noise”
If you want to hedge, you can still do this: run the free version of both, let them scan, and compare which one shows your photos in a way that feels understandable. Odds are high Disk Drill will simply feel less intimidating and get you to a clean list of recoverable pictures faster.